
Welcome to My Next Match!
This guide is for all the newcomers. You may be an athlete yourself, or you may have children who are athletes. This guide will cover the basics:
I. How do I register in My Next Match?
II. How do I get affiliated with a federation?
III. How do I book a ticket* for an event?
* On My Next Match, the term "Ticket" refers to registering for an event with a certain role; athlete, technical official, coach, team, spectator or other. When you buy a ticket, you become a participant.
---------------
I. How do I register in My Next Match?
With us today is Darth Vader! He'll be registering in My Next Match along with you.
1. Let's go to www.mynextmatch.com.
When you first visit My Next Match, you will be welcomed with the following screen.
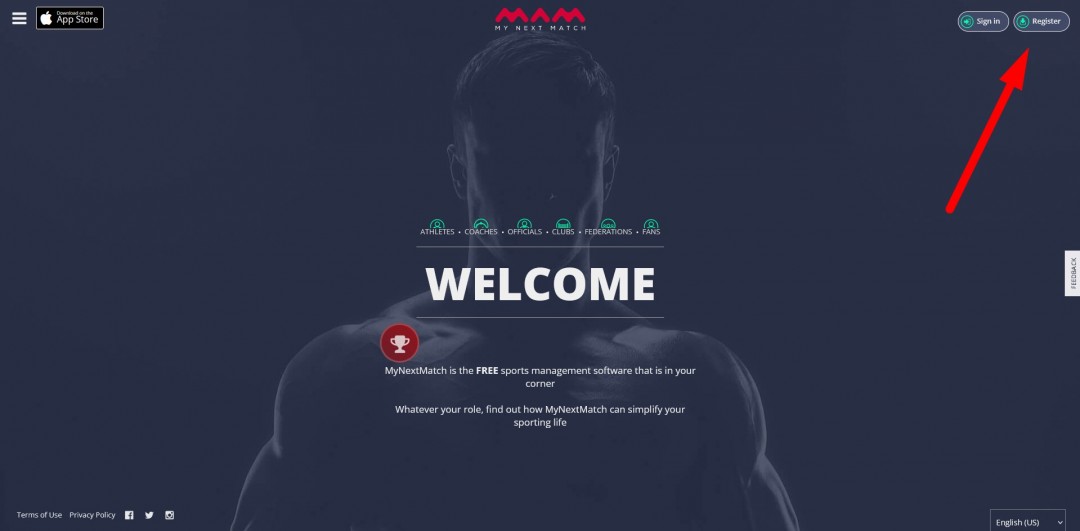
Simply click on Register to begin the process.
2. Fill in the following form and click on Register.
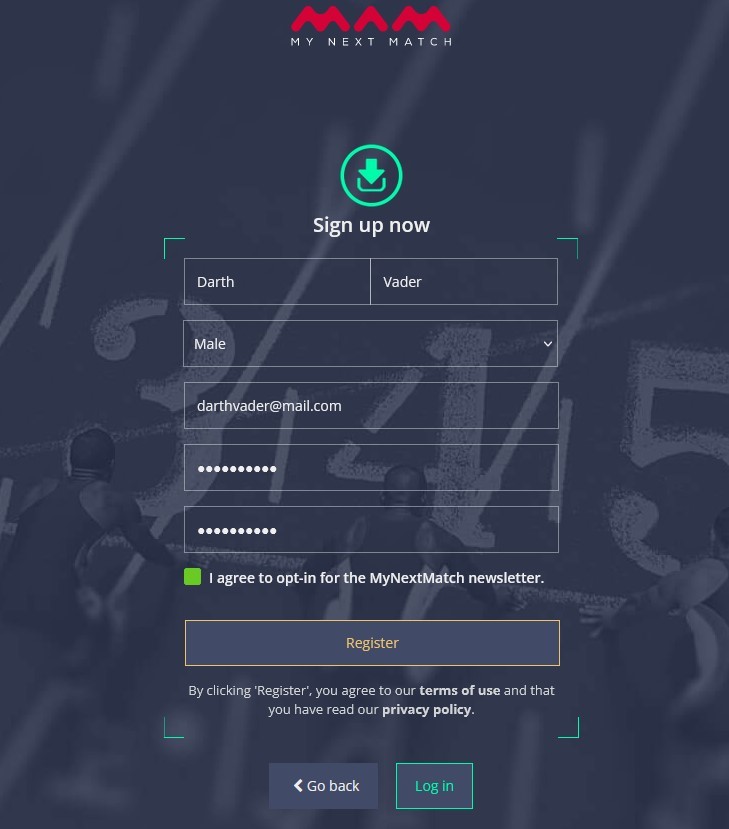
Important Note: You may think "Well, I'm not an athlete myself. I'm just the parent, so I'll just create an account for my child." — Even if that's the case, do not create your account with your child's details. On My Next Match, we allow users to "become parents" and to control their child profiles. The parent (that is you) may or may not be an athlete. There are no restrictions there. So go ahead and create an account for yourself. We'll talk about how to create child profiles in a bit.
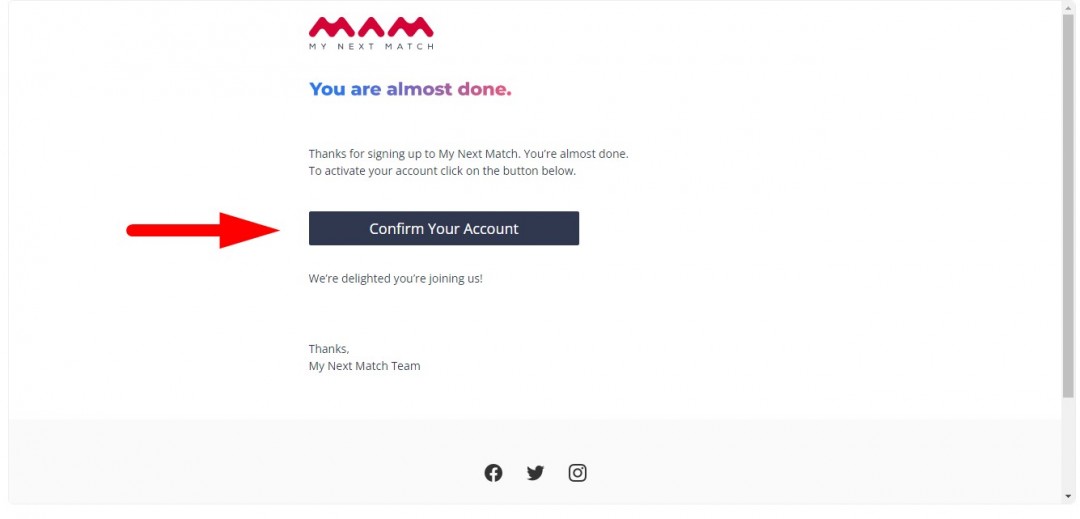
3. Check your emails. You will receive the following email to confirm your account.
4. Enter your login details and you will be taken to the Account Activation form:
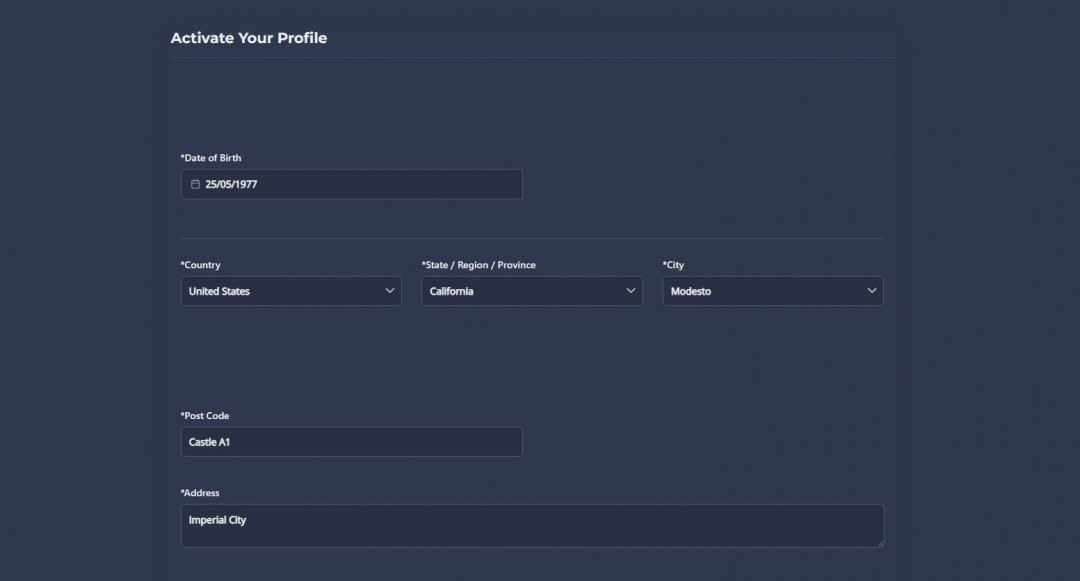
Important Note: When applying for an event, the divisions available to you will appear based on your date of birth. So, please make sure your date of birth is accurate.
Fill out the entire form, and click on Save and Go to Lobby.
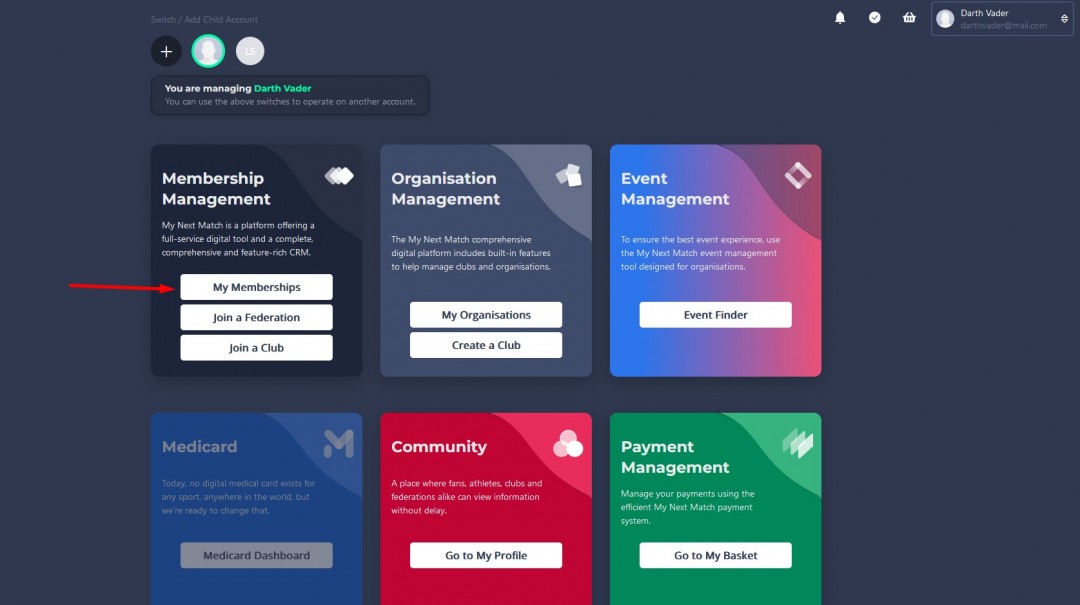
You will now be taken to the Lobby. This is what you will see:
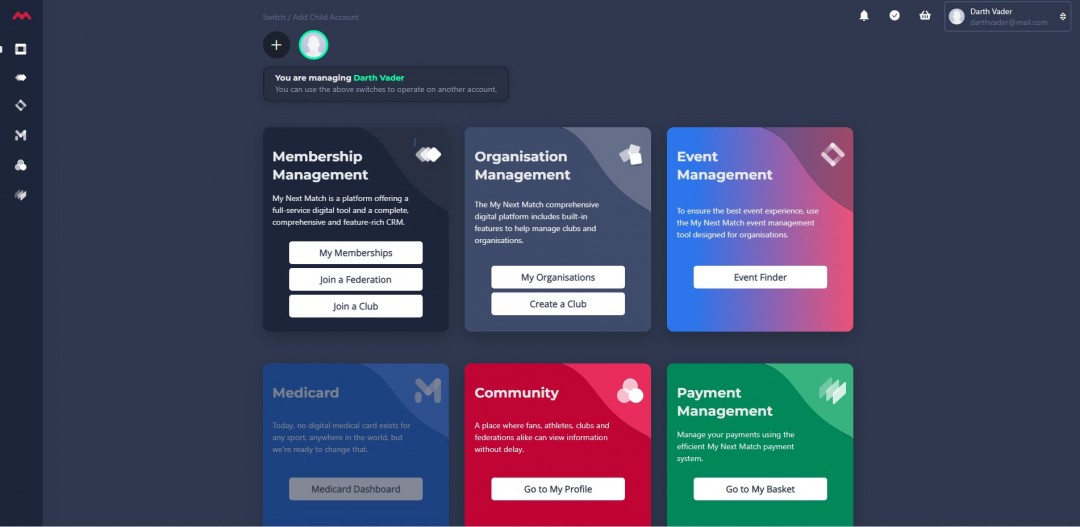
Lobby is like a hallway. From here, you can access to all the features on My Next Match.
Congratulations! You've created your account on My Next Match!
--> But what about my children?
One thing you do not want to do is to repeat the above procedure to create a new account for each of your children. This would create massive confusion on multiple levels.
Instead, we'll show how to create child profiles that are bound to your account. So it's one email address to rule them all (the one you've just used to create your account).
It's very easy to create child profiles on My Next Match.
5. On the Lobby, you will see a ![]() icon at the top. Simply click on it to create your child profile.
icon at the top. Simply click on it to create your child profile.

6. This will take you to a new form. Simply add in the details of your child, select their sport, and click "Create Account".
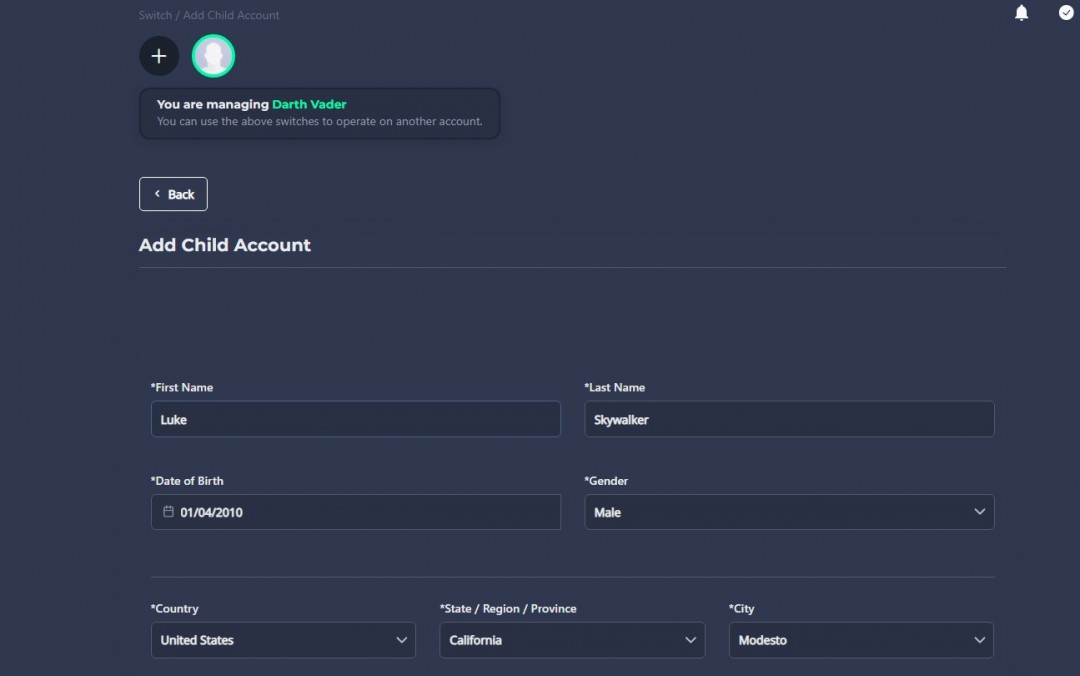
Important Note: When applying for an event, the divisions available to your child will appear based on their date of birth. So, please make sure their date of birth is accurate.
If you have multiple children, you can go ahead and repeat this process. You can have as many child profiles as you want.
And that's it! Now, on the Lobby, you will be able to see your child profile. Whenever you want to do something specific with one of your children, simply click on the circle that shows their acronym, and that's it, like below:
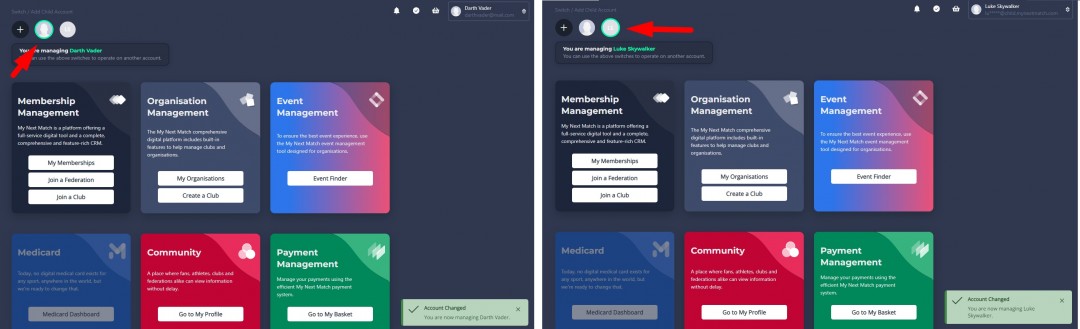
It's really simple!
For now, you will only need to do this switching if you want to affiliate your children with an organisation, which we will cover in the next section.
------------------------
II. How do I get affiliated with a federation?
* Important Note: The Ninja World Cup event requires all participants be affiliated with a federation; therefore, this step is mandatory for all participants.
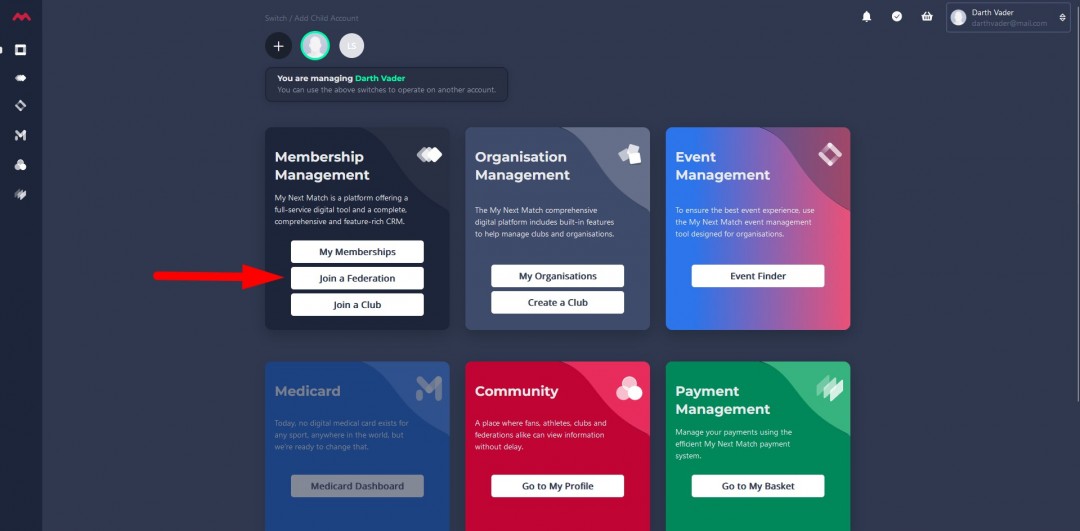
Now let's go to Lobby (if you weren't there already).
Let's say that you want to affiliate yourself (as opposed to your kids) as an athlete with a federation, then make sure you're "controlling" your own profile (the biggest circle is selected). If you have no child accounts, then you are automatically controlling your own profile at all times.
1. Click on "Join a Federation".
This will take you to the affiliation form.
2. In the affiliation form, you need to select your sport.
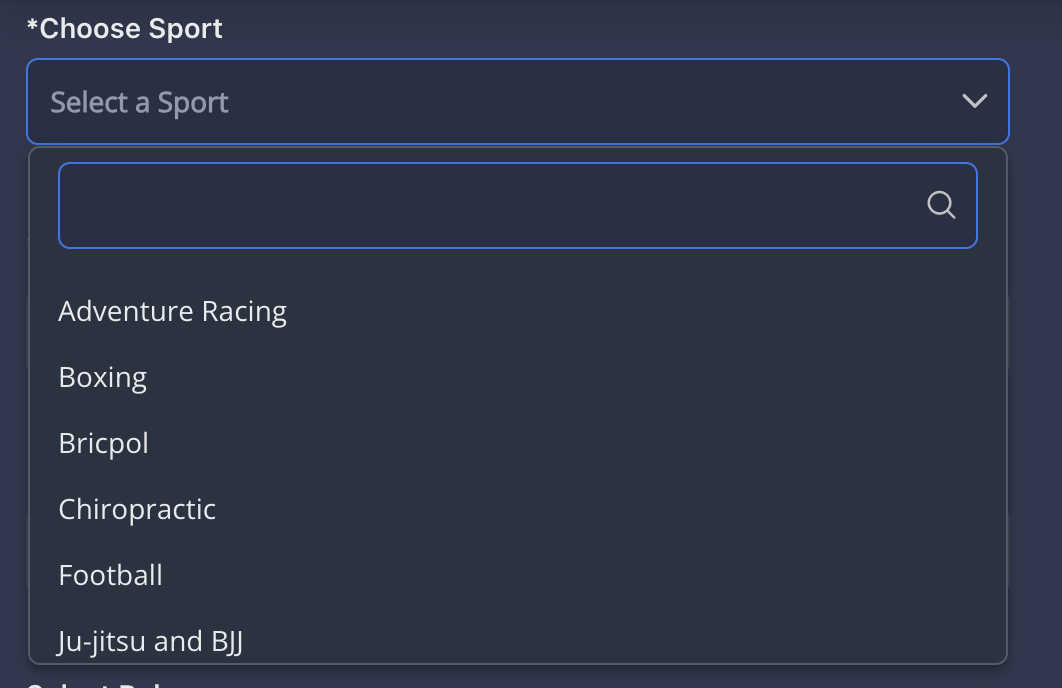
3. Select the country that you are a citizen of, and then select the federation.
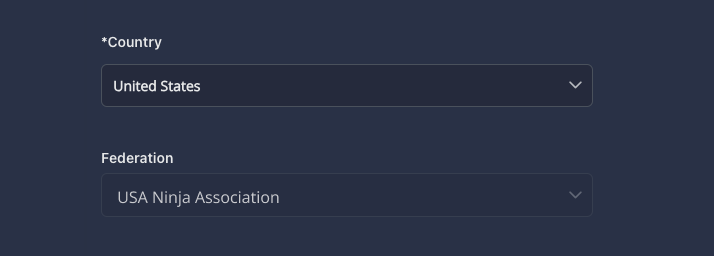
Important Note: The above picture has United States as an example, only. Attendees are required to select their own countries and the federation from that country. If no federation comes up for your country, please contact My Next Match via a help ticket.
Athletes from Russia and Belarus need to select Switzerland and "Neutral Federation".
4. Select the "Athlete" role, and choose the product.
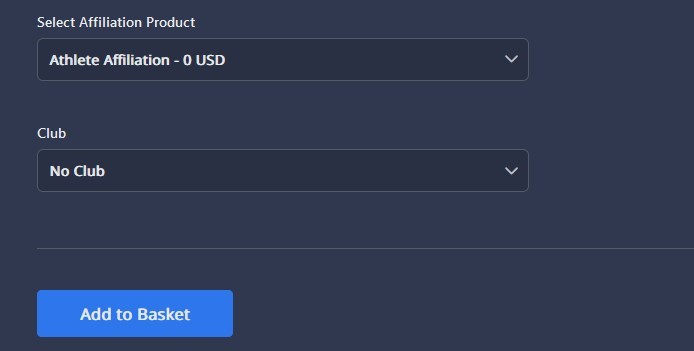
For the "Club", simply select "No club".
Once that's done, click on Add to Basket.
5. You will be redirected to the Checkout Page. Check if you've selected the correct affiliation, and click on Checkout to pay the platform fee.

(Note that, in this case, the affiliation fee was 0 USD. This may change as it's up to the federations to set up their own product fees. The platform fee is constant and not dependent on the affiliation fee.)
Simply click on Checkout and proceed with the payment.
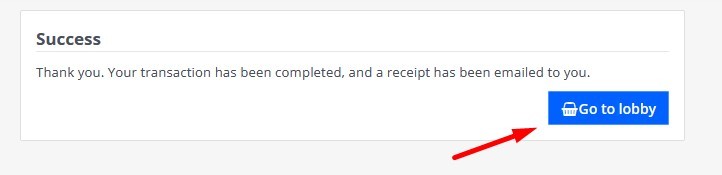
6. Once the payment is processed, you will see a success message. Good job! Click on "Go to Lobby" to... well, to go to the Lobby!
As soon as one of the admins in the federation approves your affiliation, you will become an athlete of that federation. At this point, you don't need to do anything else. You can check back to see if your affiliation has been approved by going to My Memberships in the Lobby:
If it's not approved yet, you will see the empty list below:
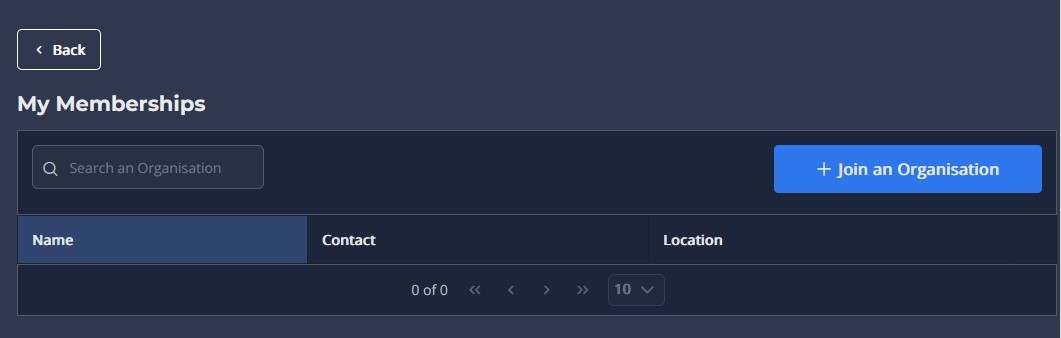
If that's what you see, it means your affiliation is still pending. You don't need to do anything. The federation admins will eventually approve it.
Once approved, this is what you will see:
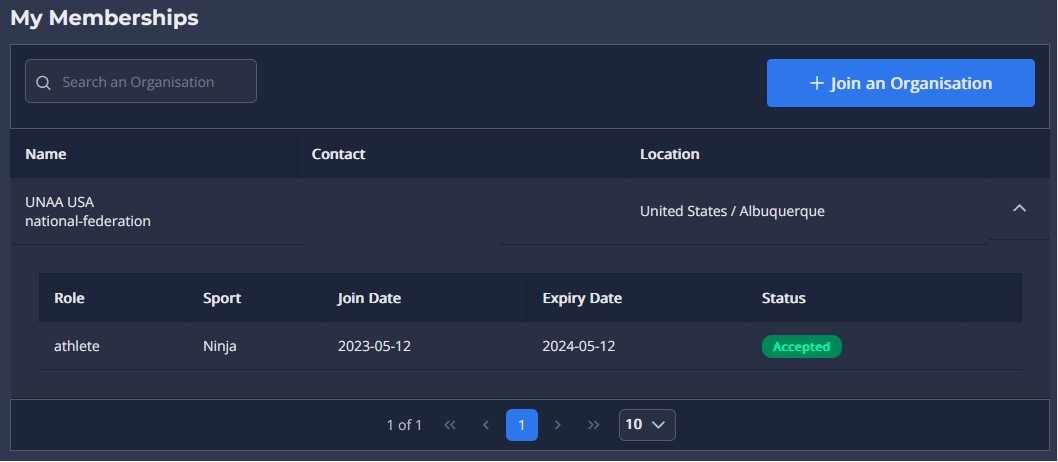
Congratulations! You've become an affiliated athlete of a federation!
--> But what about my children?
If you want to affiliate one of your children with a federation, simply switch onto their profile by clicking one of the small circles corresponding to the relevant child, and then go with the above procedure (Click on Join a Federation, and then fill out the form and check out.)
Note that, you, as a parent, don't have to be an affiliated athlete of a federation. It's okay to stay out of it as a parent and only have your children affiliated. This is the case when the parents aren't athletes themselves.
So there are three possibilities:
- You can just affiliate yourself with the federation,
- You can just affiliate your child(ren) with the federation,
- You can affiliate both yourself and your child(ren) with the federation.
* Important Note: All athletes that wish to take part in the Ninja World Cup event, need to be part of the correct federation.
It's only the actual participants that need to follow these steps. If you're a parent and both you and your children are going to participate in the Ninja World Cup event, all of you will need to affiliate with a federation.
If you're a parent, but it's only your children who will participate in the event, then you don't need to affiliate yourself with a federation. You can simply have your children affiliated, instead.
------------------------
III. How do I book a ticket for an event?
Oh the excitement!
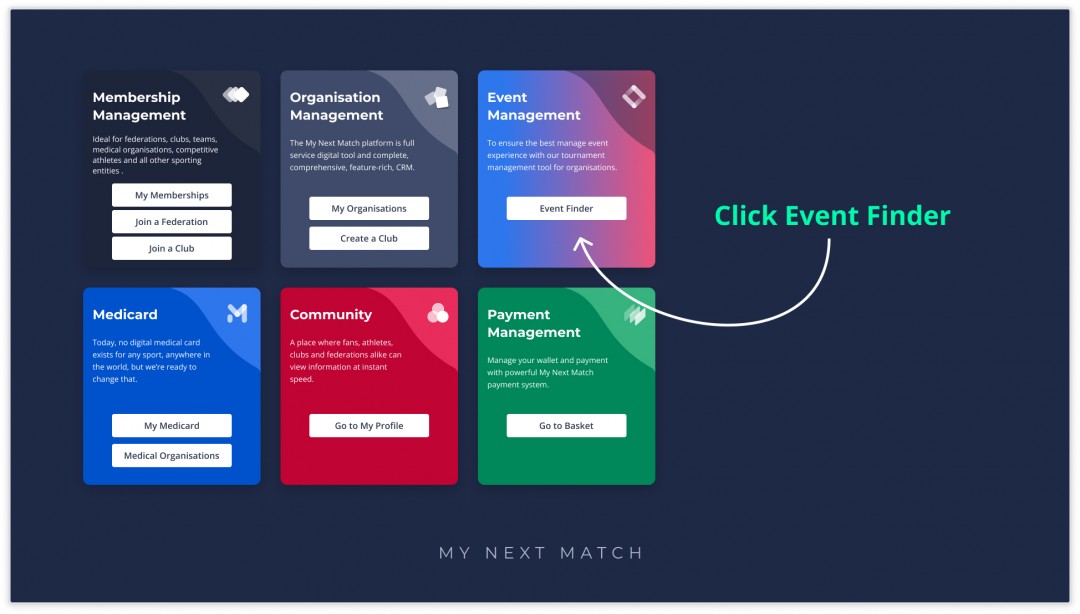
To purchase a ticket for any event, we go to the Lobby again.
1. While in the Lobby, click on "Event Finder".
(And, for this, you don't need to worry about switching between profiles. You will be able to purchase tickets specifically for you, or, specifically for your child or someone else.)
Once you click on the "Event Finder", you will be taken to the Event platform.
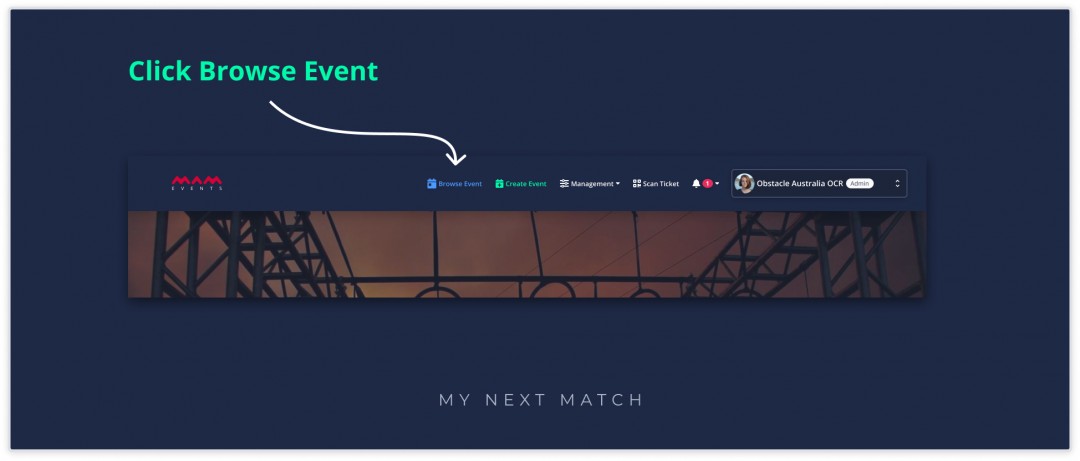
2. On the Event platform, click on "Browse Events".
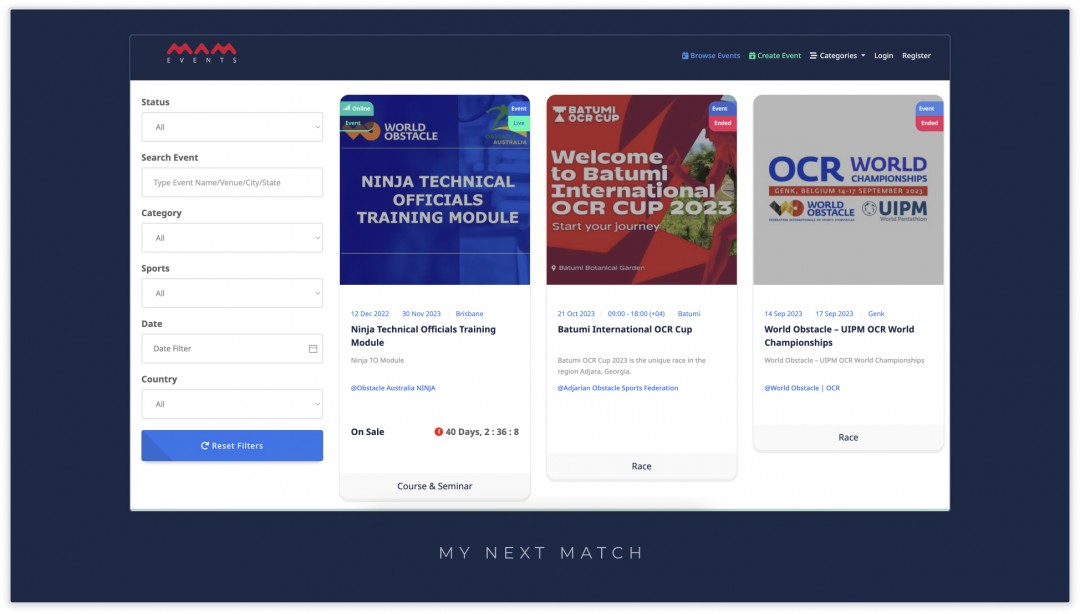
3. You can browse through the events to find the one you're looking for, or use the filters to pinpoint to it.
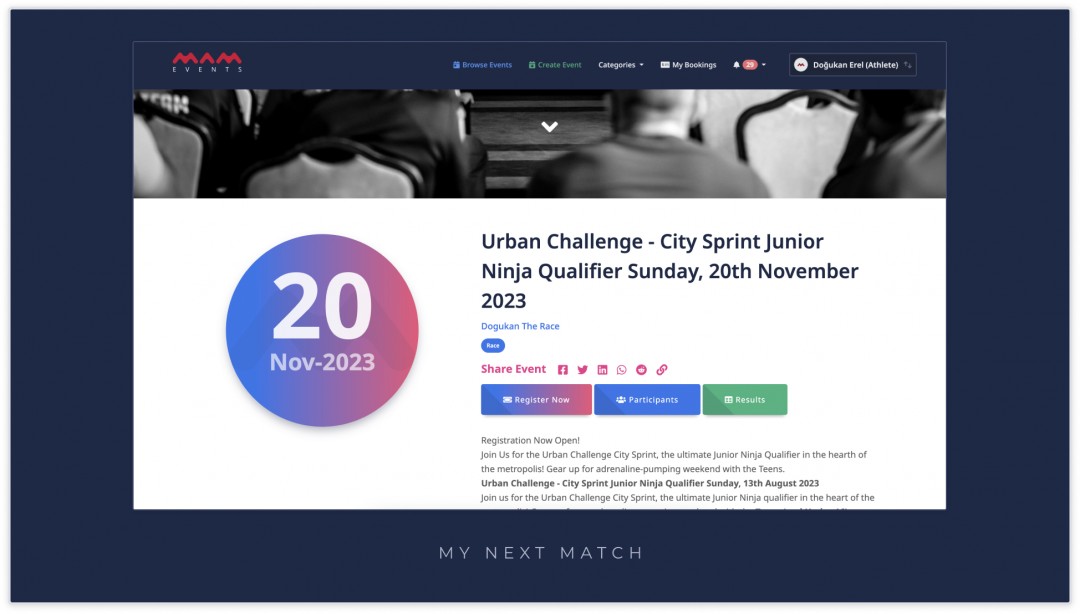
4. Clicking on the Event will take you to its main page with all the additional details.
Make sure you read the details of the event as event organisers usually give additional info on the event procedure or might ask you to fill out a specific form.
5. If you scroll down, you will also see the button to register. Let's do it.
6. On this page, you can see the open tickets for the event, filter them by role (individual, team, merchandise).
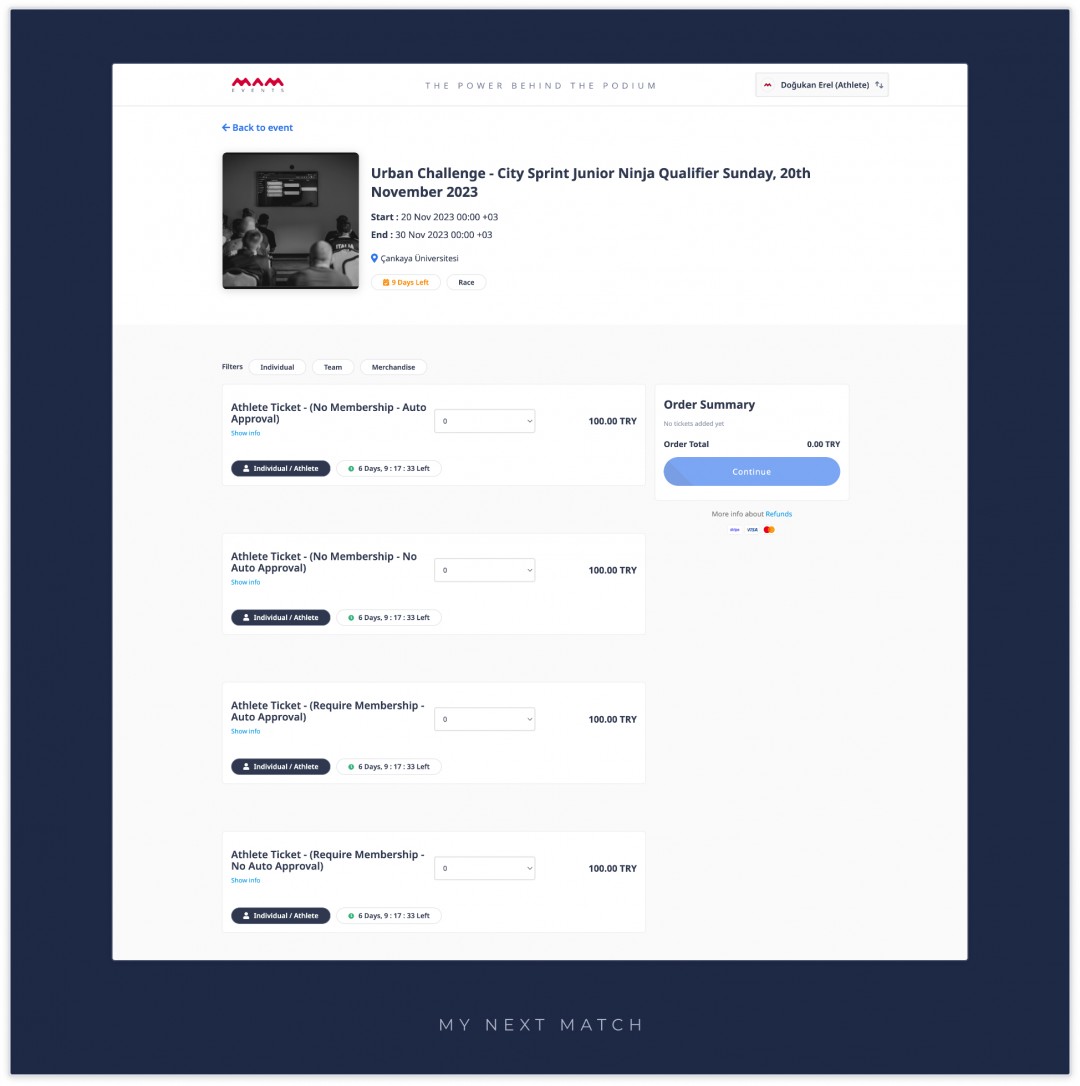
(The ticket fee that you see above is just an example. Ticket fees can vary depending on the type of the ticket, and they are set by the event organisers. Tickets will also have a deadline, so make sure you track the time remaining on each ticket so as not to miss it!)
7. Select the number of tickets you want to buy from different tickets.
Let's say that you wish to purchase one ticket for yourself and one ticket for one of your children. So let's set the number of tickets to "2".
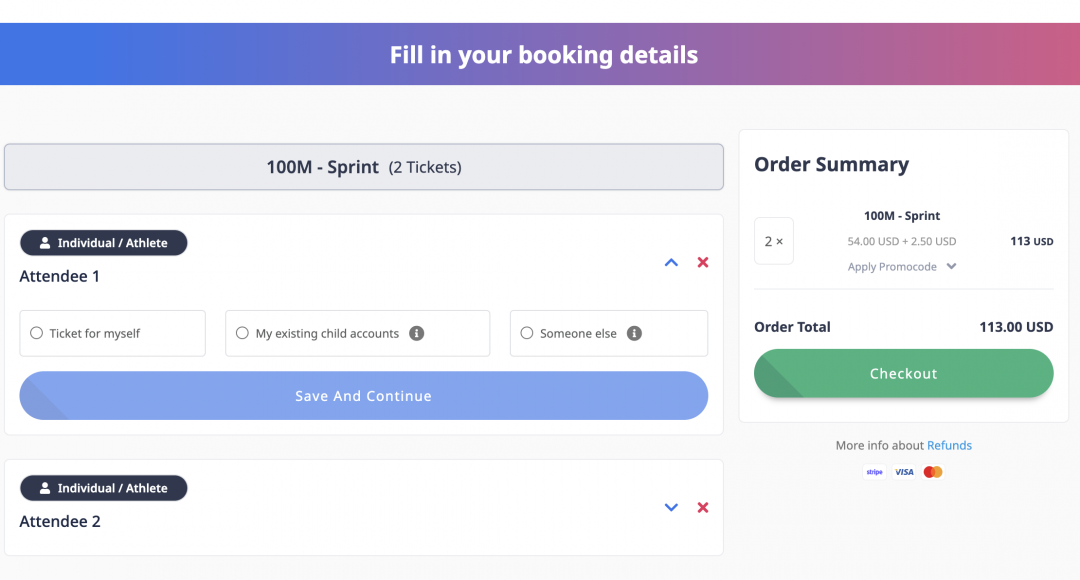
Since we've selected "2" as the number of tickets, we are asked to give the info for the two attendees. Let's start from Attendee #1.
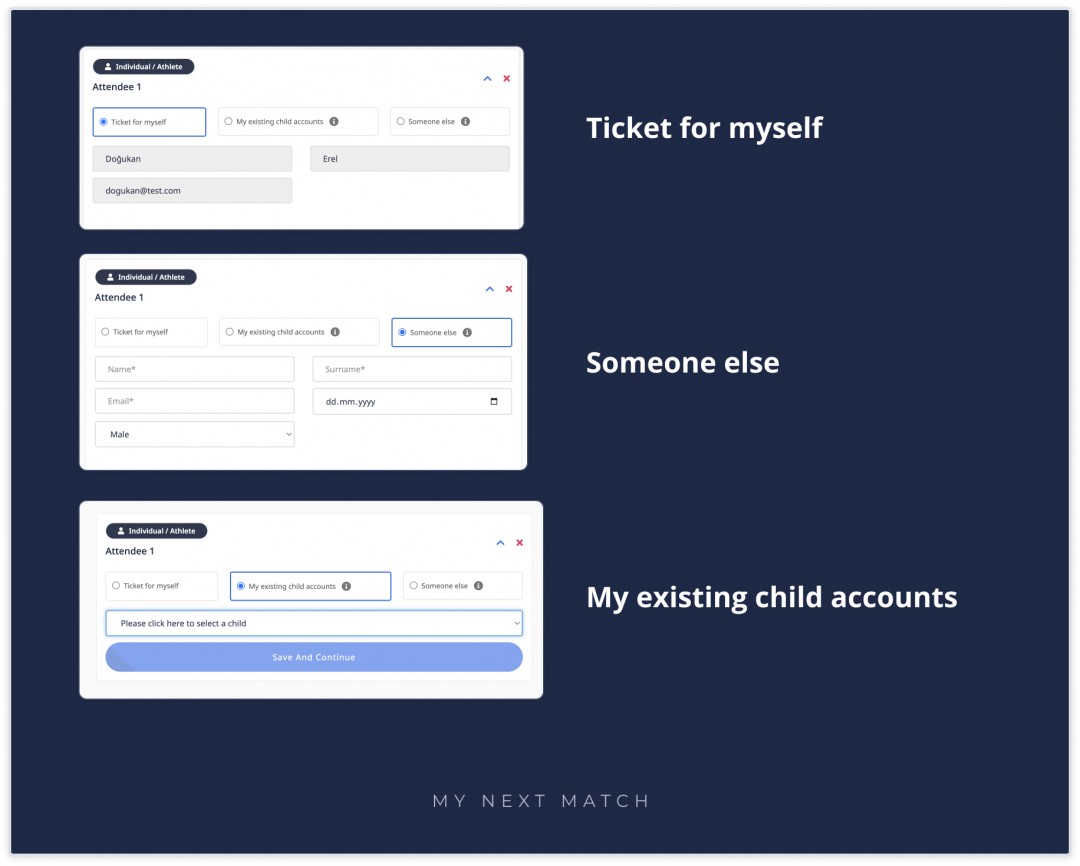
8. For Attendee #1, select "Ticket for myself", and then fill in the following details that come up.
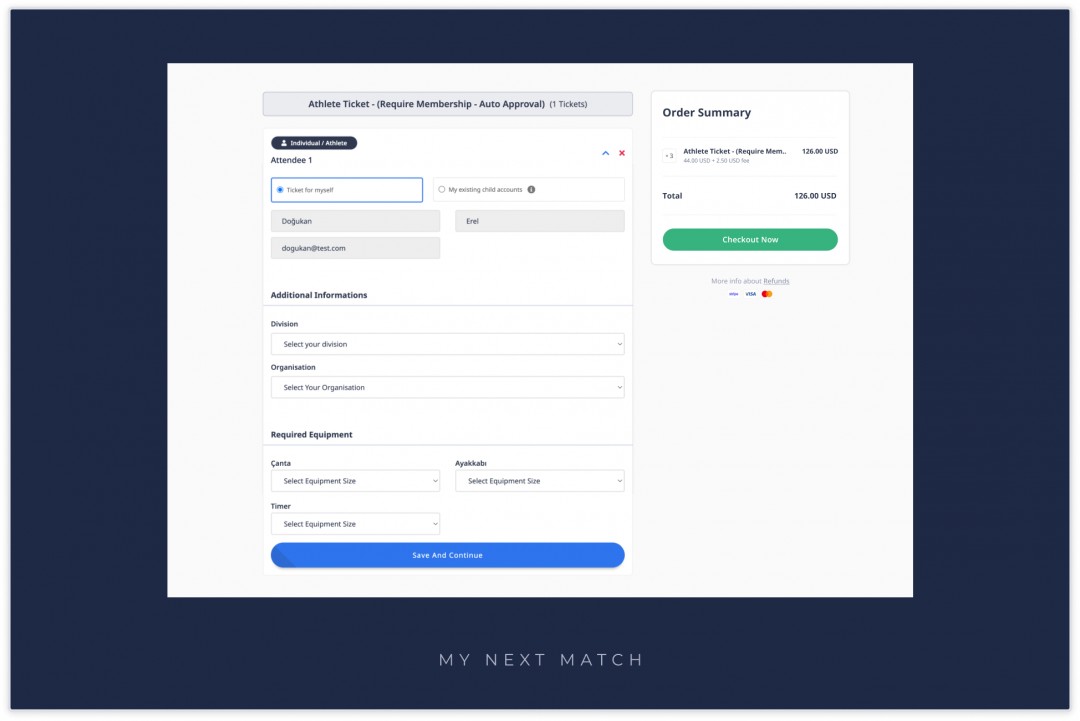
The "Add Additional Info*" will let you choose the available divisions based on your date of birth and, if it's required by the event, the federation that you're affiliated with.
If there are no division options for you, it might be because the event has no divisions for your age, or because your date of birth might be incorrect. (You can correct your date of birth by going to Account Settings in Lobby. You can read this guide to learn more about how to do it.)
Once you've selected the division (and the federation, if required), the Add Additional Info button will turn into a green "Edit Information" button. You can go back and edit it before proceeding with the payment.
You're done with this attendee (which was yourself).
9. Let's fill in the details for Attendee #2, which is one of your children.
- Select "My existing child accounts".
- Select which one of your children the ticket is for.
- And fill in the other details.
Select the division for your child. Again, if the division list doesn't come up, it can mean two things: Either the event has no divisions for your child's age or your child's date of birth might not be accurate. (You can correct your date of birth by going to Child Account Settings in Lobby. You can read this guide to learn more about how to do it.)
Once that's done, you're all set! Simply proceed with the payment and your tickets will be created and sent to your email.
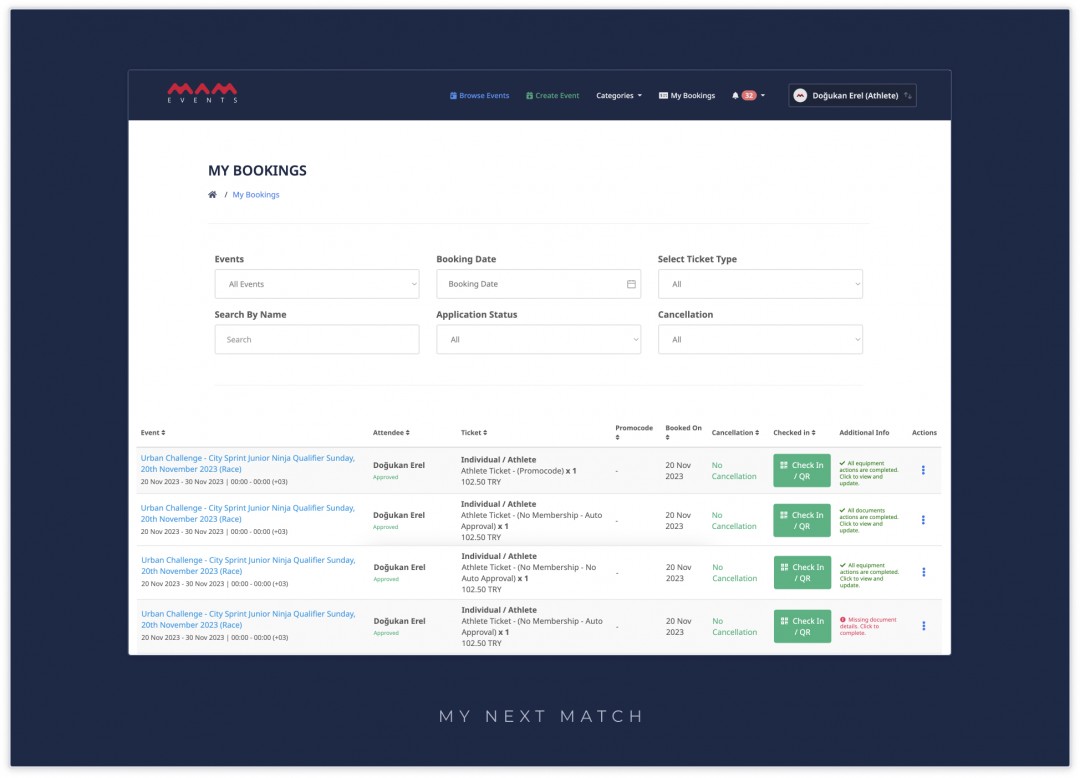
You will also be able to check your ticket in My Bookings, which you should do just in case because the event organisers might require additional documents from you, which you will be notified on in this screen:
Reminders
- My Existing child accounts and someone else options are not available for team tickets, merchandise tickets and individual tickets with technical officials, coaches, spectators and other roles.
- For more details about individual booking check the article.
That's all! Good luck on the Event day!